Monday, February 28, 2011

Spring Mantel '11

Since I took down our Christmas decorations a few weeks ago our fireplace mantel has looked like this...
...Classic, but about as exciting as a winter day without snow! ...So I decided to freshen it up for spring hoping the weather outside would catch on! I actually have some big plans for our mantel, but I wasn't about to wait on that project... I wanted spring to come now! Decorating for spring is a great way to spend the last few weeks of winter! Since we had two of the same orchids (read about that story here) I decided to put one on each side of the mantel and then search the house for things that reminded me of spring!

This is what I found…
  • three tulip shaped tealight holders.
  • a concrete lamb (I think it's from a vintage nativity scene).
  • and a small mercury glass bird.  

Looking forward to spring!


All Things Heart and Home

Make it Yours @ My Backyard Eden

Photobucket


XO,

   Jaclyn

Thank you so much for visiting CHC! I love your sweet comments, and read all of them! Please become a Follower and a fan on facebook…

Friday, February 25, 2011

Just For Fun: Valentine Orchids

For Valentine's Day the hubby and I usually keep it sweet and simple when it comes to giving gifts... We usually just pick up a few inexpensive things for each other to make the day extra special. Some years we make each other gifts and/or write each other a thoughtful letter (which I prefer, but unfortunately sometimes the busyness of today's world gets in the way). This year our gifts to each other gave us both a surprise that was actually kind of funny...

Jaclyn’s Gift to Travis…
Travis’ Gift to Jaclyn...
That's right... we got each other the same gift! I guess that means we know each other well, and we know we both like it! This May will be our five year anniversary! We've never owned an orchid before, or really ever talked about getting one, but I guess it was time! I picked mine up at Whole Foods and Travis got his at Wal-Mart... though we got the same color orchid and the same color pot, and they were both $15 (mine was originally $20, on sale for $15)! Though Travis jokes that his looks better because it has more blooms!

XO,

   Jaclyn

Thank you so much for visiting CHC! I love your sweet comments, and read all of them! Please become a Follower and a fan on facebook…

Thursday, February 24, 2011

Linen Closet to China Cabinet (Part 1)

This is just one of the many project I have going on at the moment, not to mention all the ones I have floating around in my head...


The linen closet is located at the center of our house... between the living room and dining room, across from the bathroom and also between the two bedrooms (yes, we have a small house)... so it had many functional possibilities. Since 1945 I'm guessing it has served as a linen closet, but after a few modifications it will be my china cabinet! ...You may remember me hinting about this project a few months ago in a post about the dishes I collect. I didn't think it was going to take me this long to get it to it, but we never know what life is going to throw us!
These glass shelves with a metal frame came from a home decor store (Veranda) my mom owned while I was growing up. It used to be a dull silver until the hubby and I spray painted it black. It's in our dinning room but once the china cabinet is done these dishes will go in there and I'll give this back to my parents to use in their new home. Having this shelf display gone will really open up the dinning room and give us more, much needed living space!
Just to warn you, I'm about to show you a photo of the closet as it looked pretty recently, but there's nothing pretty about it... it's cluttered and unorganized (I blurred the photo in hopes to hide the mess a bit.) I couple of months ago the hubby and I removed the bottom shelf thinking we were going to add an additional shelf by rearranging the other two. Well, in the middle of that project we were given a tour of a neighbor's home (that had a similar floor plan) and they had a staircase going up to a finished attic space where our closet is located. So, we stopped the project in it's tracks thinking that down the road we would attempt to finish our attic. Well... after seeing the structural work it would take, finishing the basement, and yada yada yada... We decided not to finish the attic... at least for now.
The first steps were removing the doors, cutting out the panels, and carving out a rim... Unscrewing the hinges was a bit of a challenge because they had layer upon layer of paint on them. (Every time paint is chipped in our house the color below it is green... walls, trim, cabinets, you name it... I seriously think at one point the ENTIRE interior of the house was painted green!)

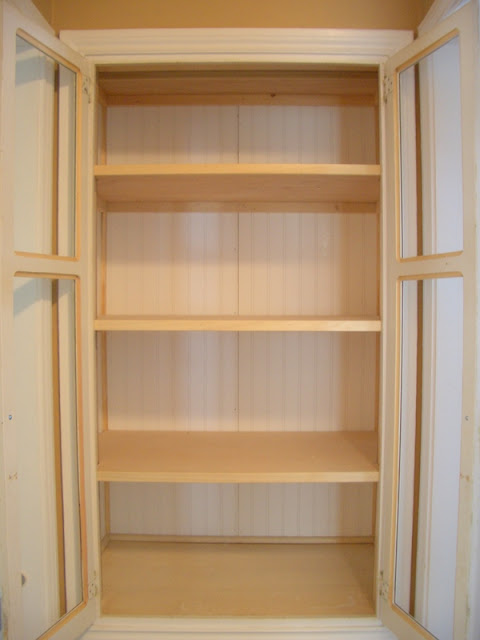
The next step was to line the cabinet with beadboard, put in three and a half shelves (which is one and a half more then what we started with), and attach some trim to the corners...
I'm not going to reveal my plan for the door cut-outs just yet, but I will tell you it's not going to be inserted with glass!
It was kind of a last minute idea, but I love how the beadboard turned out! Now it was time to fill all the cracks with caulk and all the nail holes with wood putty...

Since then I have cleaned up the excess caulk, sanded the wood putty and primed all the bare wood and doors (the beadboard came pre-primed). Now all that's left is painting the whole thing and adding the door inserts. I'll show you the finished product when it's complete!

Transformation Thursday
giveaways
Chic on a Shoestring Decorating
monogram
Furniture Feature Fridays


Stuff and Nonsense
Beach Cottage Good Life Wednesdays
XO,

   Jaclyn

Thank you so much for visiting CHC! I love your sweet comments, and read all of them! Please become a Follower and a fan on facebook…

Monday, February 21, 2011

Stylish Blogger Award

The wonderful and talented, Lynn at Cottage and Creek, has nominated Cool Home Creations for the 'Stylish Blogger Award!' ...Thanks, Lynn!

The criteria for receiving the Stylish Blogger Award...
  • Thank and link back to the person who bestowed the award.
  • Share seven things about yourself.
  • Nominate a few other, perhaps newly found, favorite bloggers.
  • Contact your nominees and inform them about the award.
    Here we go…
    ...I was born in Colorado Springs, Colorado.
    ...I grew up in an old restored train depot.

    ...I placed at Nationals in Cross Country.
    ...I asked my parents for an old sailboat for my high school graduation gift.
    ...I was a member of the Alpha Chi Omega Sorority.
    ...I have a degree in Agribusiness.
    ...I lived in Italy for a summer.

    And the Stylish Blogger Award goes to...
    A Country Farmhouse
    All Things Heart and Home
    Freckled Laundry

    Thanks for recognizing Cool Home Creations! What a fun way to share the love during the, even more so, appropriate month of February! Blessings and Happy Blogging!

    XO,

       Jaclyn

    Thank you so much for visiting CHC! I love your sweet comments, and read all of them! Please become a Follower and a fan on facebook…

    Sunday, February 20, 2011

    Scrabble Letter Magnets

    I love incorporating letters and numbers into my decor, so when I found these scrabble letters at one of my favorite antique stores I thought of a fun idea. Something for my girls, as well as, something for others to enjoy! All I needed was some round adhesive magnets that I picked up at Hobby Lobby and my letters went from this...
    To This…
    The letters on the stove are for my girls to play with! It creates a fun way for them to practice the alphabet and spelling. (My two year old already knows all the letters and words that begin with each one!)

    The letters on the refrigerator I'm using for names, words and phrases. As you can see it currently says, "THE COOL FAMILY," and my girl's names, "ANGELIA" and "CHIARA." I think I'll add some fun words, such as, "LOVE," "JOY," "PEACE"... "PASTA," "APPLE," "BREAD," "OLIVE OIL," "MILK,"... "BASIL," "THYME," "ROSEMARY," "SAGE," etc. And some fun phrases, such as, "LET'S EAT." You could even do a favorite bible verse or quote!
    Note: If you want your letters permanently fixed together into names or words you could use adhesive magnetic strips.  
    This is just one of the many fun things you can do with Scrabble letters! ...You could also use them to label jars and baskets or display inside shadow boxes! 
    All Things Heart and Home
    Beach Cottage Good Life Wednesdays

    Make it Yours @ My Backyard Eden


    XO,
       Jaclyn

    Thank you so much for visiting CHC! I love your sweet comments, and read all of them! Please become a Follower and a fan on facebook…